
This tutorial was written by Livia @ Liv Luvs Scraps on May 2, 2009 and is my own creation. Any resemblance to another tutorial is a coincidence! DO NOT take anything from this site and claim it as your own, including my ideas. Anything you create from this tutorial is yours, as long as you don’t make any money out of it. Please remember to only use images/tubes that you hold a license to, or are free for personal use. (Check an artist’s TOU before using their work!)
Supplies you’ll need:
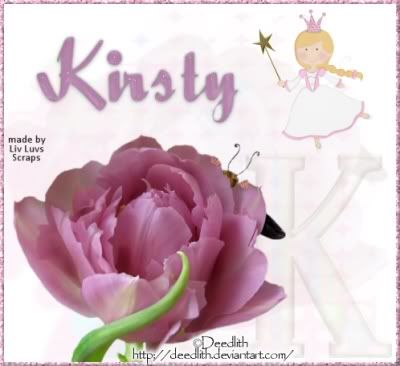
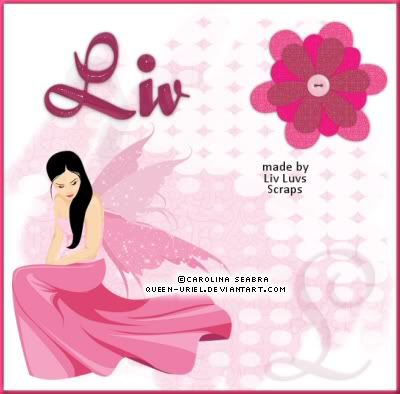
Tube of choice – I’m using a tube from Deedlith for the first tag, and one from Carolina Seabra for the second tag (at the bottom).
Scrap kit of choice – the kit I’m using is “I Do Believe In Faeries” by Kirsty’s Scraps, which may be purchased here
Filters: * Eye Candy 5 Impact (a pay filter, sorry!) OR Eye Candy 3.1 (now a free filter) – you can find it for free if you search for it on Google :)
Glass preset “SK Candy Sticks Shine” by Shawna @ Scrap Stuff With PSP
Mask of choice – I used “183MaskkelsWWA” – if you don’t have this mask, there are heaps of great ones at Vix’s PSP [put the mask in your ‘Masks’ folder]
Font of choice – I used Quigley Wiggley by Nick’s fonts
REMEMBER…Save your work often!!!
I will be referring to specific elements from the kit I’ve used, so if you aren’t using the same kit, use the elements you like from your kit of choice. At the bottom of this page, I’ve included an example using one of my own kits, to see that you can make this tag with any kit of your choosing. :)
This tutorial assumes you have knowledge of Paint Shop Pro and its features.
Open up a 600x600 canvas – you can resize it later. Fill the canvas with white (for our background).
Now open up the tube you will be using, duplicate it (so you don’t accidently do something to the original!) and close the original. Minimise this – you won’t need it for now.
Open up a paper from your kit of choice – I’m using Paper 16 from “I Do Believe In Faeries” (which I will call IDBIF from now on!)
Go to Layers/ Load/Save Mask / Load mask from disk; make sure these are selected: Source Luminance, Fit to canvas, Invert transparency, Hide all mask. Click Load.
Merge group – lower opacity to 20.
Copy & paste your tube onto your canvas – drag this layer under the masked paper layer.
Lower the opacity to 6 (or a very low number of your choice)
Paste the tube, and drag this layer to the top, resize by 70%, and position it at the bottom left of the canvas
Open up an element from your kit of choice (I’ve used Fairy-Tate from IDBIF), resize by 30%, position at top right of the canvas
Crop your canvas to a size you like.
New raster layer, move to top. Select all, Selections/Modify/Contract by 5, invert
Open glitter of choice (I’ve used Glitter-1 from IDBIF), fill the 5 pixel border with glitter as a pattern, scaled at 40. If your kit doesn’t have glitter, you can fill it with a paper or colour of your choice.
With this border still selected, go to Effects/Inner bevel, and use:

From your kits’s alpha - open the first letter of the word/name you’ll be typing. Copy & paste, position bottom right, lower opacity to 12.
If your kit doesn’t have an alpha, you can type the first letter using a font of choice, add an inner bevel and lower the opacity to 12.
Using a mid-dark colour from your tube, type in your word/name you’re using.
Using Eye Candy 5 Impact Glass, to the Settings tab, click on Manage/Import then find the “SK Candy Sticks Shine” preset you’ve downloaded as part of the Candy Sticks supplies.
Now you’ll see that the preset has been added to your User settings. Click it, and press ok.
If you don’t have Eye Candy 5, you can use Eye Candy 3.1’s Glass with the Transparent Button preset (in the drop down menu).
Add a drop shadow of choice.
Now all you have to do is add the copyright/licensing info, and your watermark!
Save it as a JPG...and you’re done!!!


No comments:
Post a Comment