

This tutorial was written by Livia @ Liv Luvs Scraps on May 15, 2009 and is my own creation. Any resemblance to another tutorial is a coincidence! DO NOT take anything from this site and claim it as your own, including my ideas. Anything you create from this tutorial is yours, as long as you don’t make any money out of it. Please remember to only use images/tubes that you hold a license to, or are free for personal use. (Check an artist’s TOU before using their work!)
Supplies you’ll need:
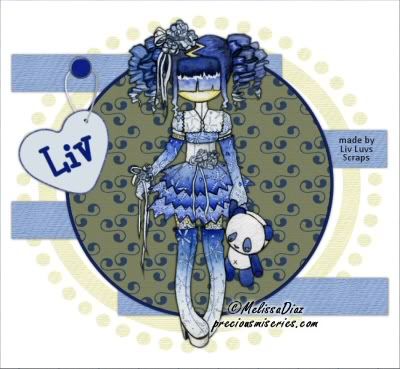
Tube of choice – I’m using a tube from for the first tag Carolina Seabra, and one from Melissa Diaz (@ The Precious Miseries Manor) for the second tag (at the bottom).
Scrap kit of choice – the kit I’m using is “Misfit” by Kirsty’s Scraps, which is a free tagger kit found on her blog!
[No outside filters are needed!!]
Mask of choice – I used one from Creative Desires, which is no longer on the net (I can’t find it anyway!) – if you don’t have any mask from them, there are heaps of great ones at Vix’s PSP [put the mask in your ‘Masks’ folder]
Font of choice – I used BoyzRGross by Nick’s fonts
You will also need my LLS_TagTemp_001-PU template, which you can get from here (zip includes .psp, .pspimage & .psd formats)
REMEMBER…Save your work often!!!
I will be referring to specific elements from the kit I’ve used, so if you aren’t using the same kit, use the elements you like from your kit of choice. At the bottom of this page, I’ve included an example using one of my own kits, to see that you can make this tag with any kit of your choosing. :)
This tutorial assumes you have knowledge of Paint Shop Pro and its features.
Open up my LLS_TagTemp_001 template, duplicate it (so you don’t accidently do something to the original!) and close the original.
Do the same for your tube of choice.
Merge group – lower opacity to 30 (or whatever you think would look best for your tag – you can always change it later).
Open up another paper of choice (I used paper 16 from “Misfit”). Copy it.
** Click the ‘stripes’ layer, and paste your paper in a new layer above this one.
Back on your ‘stripes’ layer, go to Selections/Select All (or press Ctrl+a if you’re using a windows computer), then go to Selections/Float (or Ctrl+f), then Selections/Defloat (or Ctrl+Shift+f). Now go to Selections/Invert.
Click on your paper layer above the ‘stripes’ layer. Press Delete.
Add a drop shadow of choice. **
Repeat the above steps (in between the stars [**]) for your back circle & front circle, using different papers. (For the back circle I used glitter 4, and for the front circle I used paper 8, both from “Misfit”.)
Hide the original template layers named ‘stripes’, ‘back circle’ & ‘front circle’.
Copy & paste your tube onto your canvas and move this layer to the top. Add a drop shadow.
Optional step: If the kit you’re using has a circle glitter frame, like the one I used from “Misfit”, you can copy & paste it in a layer on top of your front circle, and add a drop shadow.
It’s time to add your name/text.
Copy & paste an embellishment of your choice from the kit – preferably one that text will look good on (I used Charm-1 from “Misfit”, and added a white background to the inside of the charm, and lowered the opacity to make it look like clouded glass). Move it to one side of your tube. I slightly changed the angle of my charm, so it looks like it’s hanging! :)
Add a drop shadow of choice.
Using a colour from your tube & your choice of font, type your text. If you’ve put your element on an angle, rotate your text the same way.


No comments:
Post a Comment